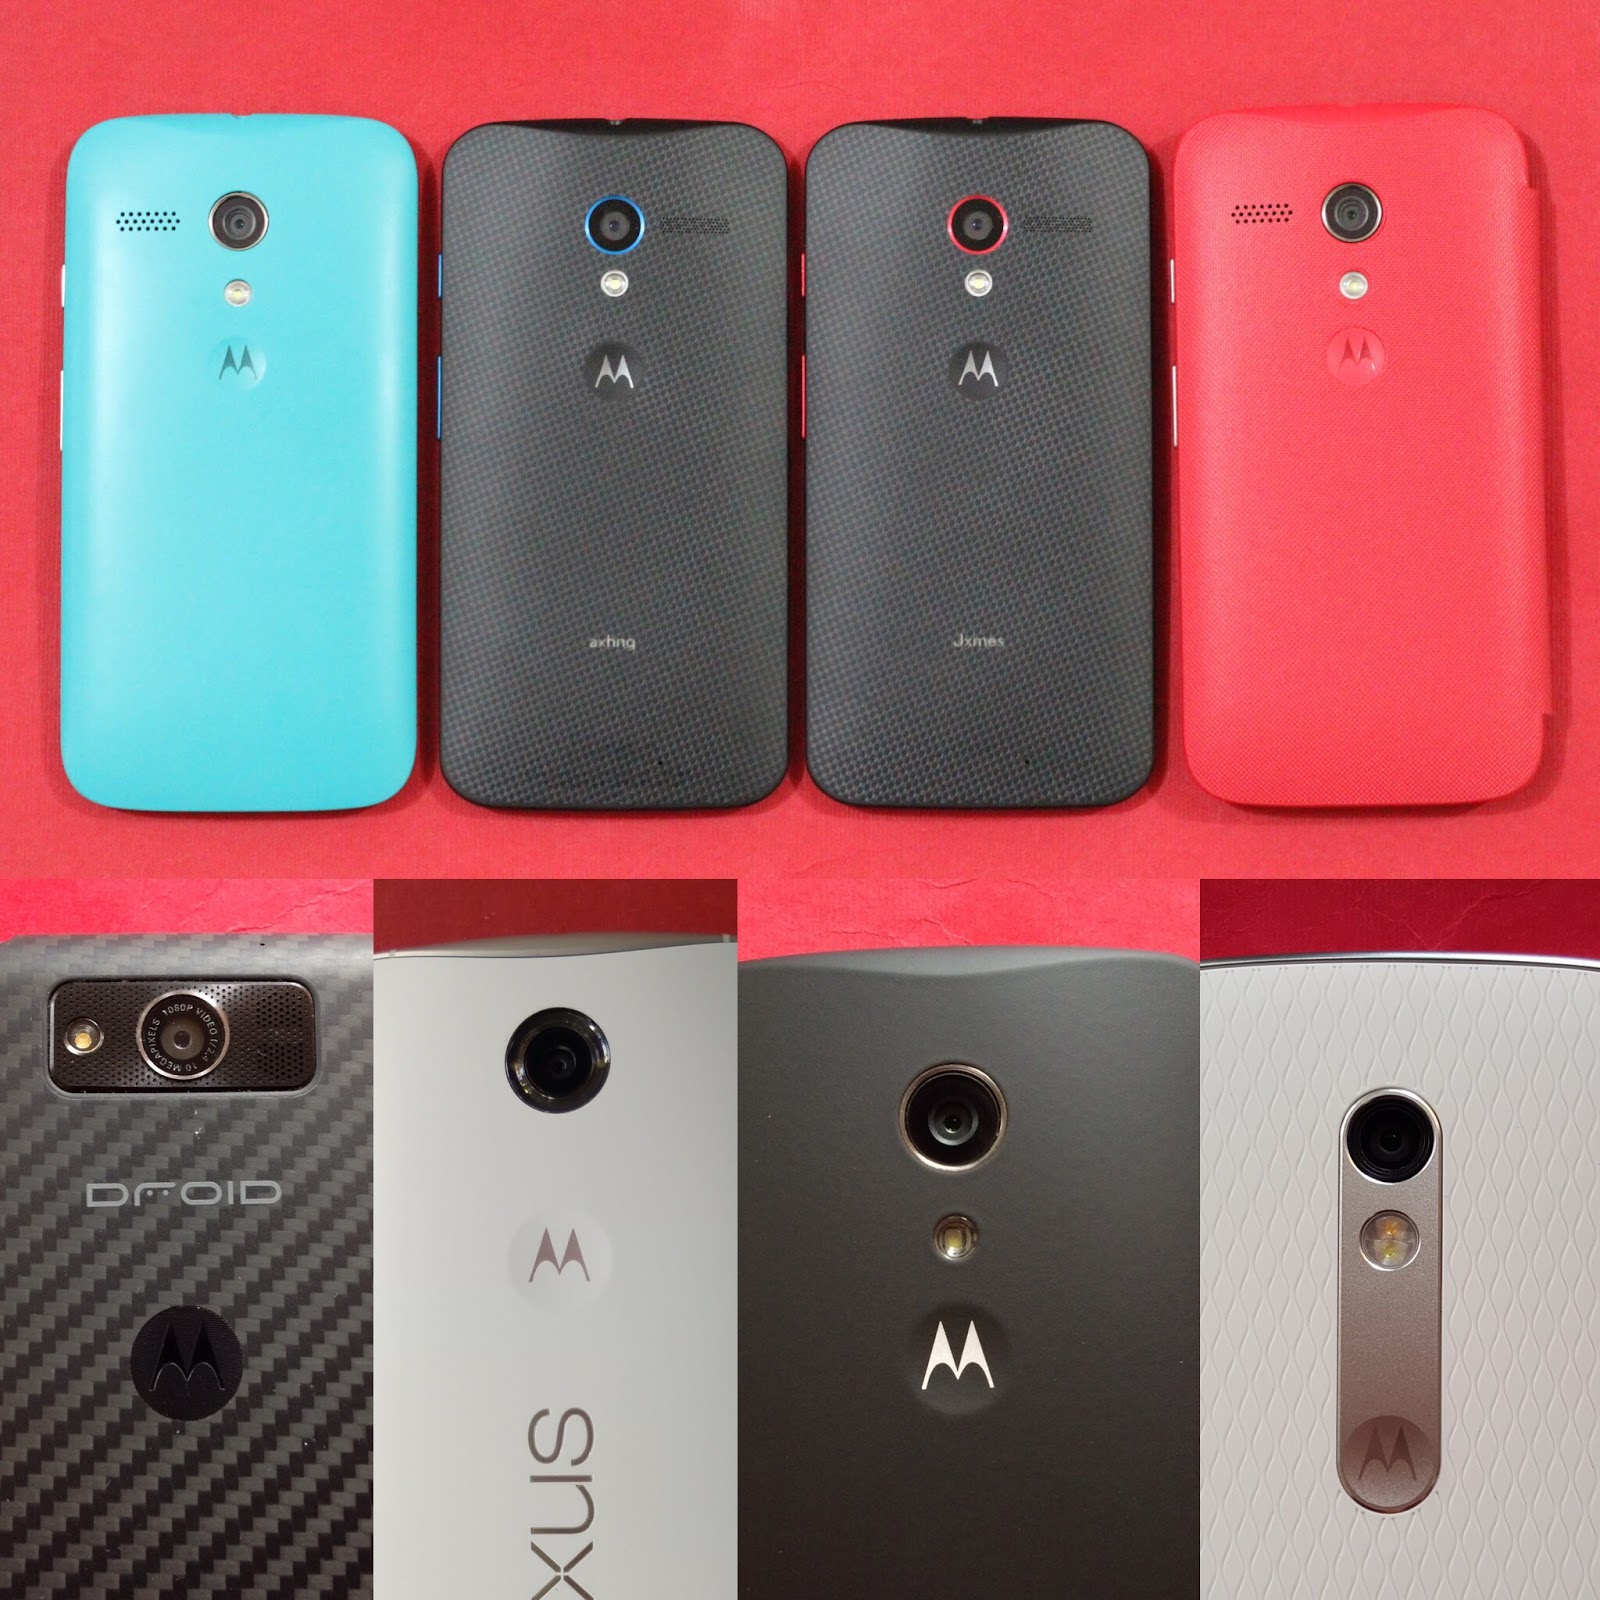
When I heard the new Lenovo showroom in Marina Square had a Moto booth showcasing and selling Motorola phones, I went down to have a look as soon as I had time.
It's a pretty small booth, but still marks an important step towards bringing the Moto branding back into mainstream.
(Closer look at the 4 Moto phones sold here officially.)
Only 4 Moto phones are being sold here, and they are the Moto G Turbo Edition, Moto X Style, Moto X Force, and the recently released Moto G4 Plus.
What I am more excited about are the new Moto Z phones, which could possibly make their way here too now that Lenovo is officially selling Moto phones in Singapore.
Motorola, under Lenovo has been off to a very rocky start. Key personnels leaving the company (Rick Osterloh, Jim Wicks), less than ideal customer support, and the death of the Motorola name. All that survived seems to be the Moto branding and bat wing logo.
As a Motorola fan though, this is all very disappointing. However, I am still holding out a bit of hope that Lenovo can do right by the Moto name. That they can bring the brand back to its former glory.
Let's just say I am not quite ready to bury Motorola just yet.
Selamat malam ab lovers di sini saya mau ngasih trik tentang cara memakai video smule di android jelly bean dan di bwahnya yaitu dengan cara mengedit buil.prop oke langsung cekidot...
Pastikan Hp anda sudah di root kalau belum di root download king root DI SINI
Intal Dan jalankan king root maka secara otomatis Hp anda akan ke root
Pertama kita harus punya Root Explorer kalau belum punya bisa download DI SINI
instal Root explorer dan buka aplikasinya nanti ada permintaan akses kamu klik yes aja :D
Rubahlah R/W ke R/O
Cari folder yang namanya System
Cari berkas yang namanya Build.prop
klik build.prop agak lama truz pilih open with tex editor
Edit Build.prop dengan teks seperti berikut ke build.prop nya
ro.product.model=GT-I9505
ro.product.brand=samsung
ro.product.name=SM-N900S
ro.product.device= SM-N900S
Save dan Exit ...terus restart hp sobat
Truz pergi ke google play download pembaruannya ...tara hp anda bisa video smule
NOte: Pihak penulis tidak bertanggung jawab atas resiko yang akan di tanggung bila ada kerusakan hp krna akibat anda mengikuti cara tersebut ,,,di sini saya cuma memberi ilmu :D
Permainan pokemon yang sangat Booming akhir akhir ini telah banyak di cintai oleh kalangan dari anak - anak sampai dengan orang dewasa tapi ada kelemahan yaitu tidak bisa di rasakan oleh android kalangan bahwah tapi tenang aja sob di sini saya akan bagikan triknya langsung cekidot...
Cara Memainkan Pokemon Go Di Android Jelly Bean
Download Pokemon Go Mod android Jelly Bean ( Link Diakhir Posting)
Instal, saat proses instalnya lumyan lama tunggu saja.
Buka aplikasi Pokemon Go 0.29.2 versi android Jelly Bean.
Klik kotak putih di sebelah kiri (Close) jika muncul gambar android bertuliskan Mod by iHackedit.
Tunggu beberapa saat. maka akan muncul halaman awal Pokemon Go, pilihPOKEMON TRAINER CLUB (jangan menggunakan akun google karena force close)
Pilih POKEMON TRAINER CLUB.
Jika kalian Belum punya akun Pokemon Trainer Club Bisa daftar disini
Setelah mendaftar saat nya kalian untuk Sign in di game Pokemon Go dengan cara Masukan username dan password kalian kemudian pilih Sign in.
Mengatasi GPS Signal Not Found Pokemon Go Android
- Buka " Pengaturan smartphone --> App --> pilih Pokemon Go --> kemudian klik Force close atau paksa berhenti " - Jika Pokemon Go sudah di force close, sekarang buka " Pengaturan smartphone --> Location / Lokasi --> Klik Mode --> kemudian pilih High accuracy" (jika Ada) - Jika sudah, buka kembali " Pengaturan smartphone --> About Phone / Tentang Ponsel --> klik build number / nomor bentukan secara trus menerus sampai fitur developer aktif. -Kemudian buka kembali " Pengaturan smartphone --> developer / mode pengembang --> nonaktifkan allow mock locations.
Detikdotinfo test Pokemon Go Jelly Bean Model : Samsung Galaxy Young 2 Os Android : Jelly Bean 4.1.2 Ram : 512Mb Test : work
gampang kan itulah langkah langkah instal pokemon go di android jelly bean
My trusty Jaybird Bluebuds X died on me during a jog in a light drizzle last week. To be fair, it wasn't the first time I've used it in similar, wetter conditions. It served its purpose more than well enough, for long enough.
So it's time for a new pair of buds.
This is where the Samsung Gear IconX comes in. I was able to loan a unit for a short while, and thought I'll share some of my thoughts on the device.
This is a really tiny pair of earphones. The design is simple and clean, and comes with a case that is used to charge and transfer music onto the IconX. It fits nicely in the ear too, I just had make sure to find the correct earbuds size for my ears.
The touch pad is the only way to control the IconX.
The controls take a minute to learn and are easy to remember. The responsiveness could be a bit better though. There is a slight delay between tapping the touch panel, and something actually happening.
The touch panel can be a bit frustrating to use while jogging too, especially when sweat is added into the mix. It is easy to accidentally loosen the earbuds while adjusting volume. When I tried to push it back in again, I ended up pausing the music because of the touch panel. I would recommend just finding a right volume, and just sticking with it throughout the activity to avoid the hassle.
It sounds decent, but I still prefer the sound on the Jaybird. Not that the IconX sounds bad, but I think it's just down to the EQ. Sadly there is no way to tweak the EQ on the IconX when using it as a standalone music player. I wished that the max volume could be just a tiny bit louder as well.
I tried a quick Hangouts voice call with a friend, and sound only came from one side. Audio was clear on my side, but he mentioned I sounded a little muffled on his end. Considering I was waiting for a bus and there was traffic nearby, I think it did well enough. This is not something I often use anyway.
(The left side has less battery because I when I made a Hangouts call, sound only came from that side)
Battery life is definitely the weakest point on the IconX. The rated 1.5hrs of playback when streaming from a smartphone seems about right in my time with it. Which means that I can't even watch a full movie on my phone using the IconX. Using the IconX as a standalone music player yields better battery life, and as per other bluetooth earbuds, volume plays a part too.
The earbuds have a 47mAh battery, and the case adds another 315mAh. Even then, based on my usage I would probably have to charge it every day if I were to use it for both my commute to and from work, as well as for a jog afterwards.
As a gauge, I only charge the Jaybird Bluebuds X every other day with similar use.
Pairing is done using Gear Manager, and officially it only works for Android devices with at least 1.5GB of RAM, and Android 4.4 KitKat and up (it works with the Gear Fit2 and Gear S2 though). Settings are tweaked using the app too.
There is an option to transfer music from phone to IconX using the included OTG connector with Gear Manager, but this option only shows up for Samsung phones it seems. I saw the option on the Note5 and S7 Edge, but not the LG G3 that I tried.
I prefer using my PC to transfer music. Once I inserted the device into my PC, it appeared as a removable drive. The software required to transfer music was already preloaded on the internal memory of the IconX.
I am using an iMac at home, and thankfully, there is a Mac OS X software too! The Gear IconX manager does basically 2 things. Transfer music, and update software. It doesn’t support drag and drop unfortunately, so I had to use the file picker.
(Left: Endomondo tracking using GPS, Right: Gear IconX)
I brought the IconX out for a jog, but forgot that I needed to activate activity tracking manually. I activated it at around 0.28km, so meaning the distance measured (using accelerometer) by the IconX differs from the one using GPS on my phone by only around 0.04km. Note the heart rate tracking too. The activity can be seen on S Health after it synchronises with the phone.
The IconX can also provide audio feedback at intervals, with information like distance, heart rate, duration, etc. These are customisable using Gear Manager.
-----
The IconX was actually much better than I expected it would be. The relatively accurate distance tracking was really impressive, and the heart rate monitor was a nice bonus. Sound quality is decent too, and the design is excellent. The device is also splash resistant (P2i Nano Coating), and should withstand sweat well (heavy rain is probably no go though). I could see the IconX as being a great match for someone who wants to bring as little with them as possible when going out for a run. This is pretty much the only device needed for music playback, and basic activity tracking.
For myself though, the RRP of S$298 is just a little bit too steep for a pair of wireless earbuds that I will only ever use it for playing music. I still prefer to have my phone with me when I jog for safety reasons, more accurate GPS tracking, as well as mobile payment for when I want to get a drink after my jog. So the fitness tracking part is not really useful for me other than heart rate monitoring, something which I can do without. The notifications aspect of it is a feature I won't use as well considering the lacklustre battery life.
For a first generation, truly wireless earbuds, this is a pretty good try from Samsung.
So... I stole borrowed a Gear 360 from a friend to play with...
To start off, I would like to say that this is NOT a review of the Gear 360. It's hard to review something when it's the only product of its kind that I have used. So if you're looking for comparisons with other 360 cameras, there are plenty on YouTube.
This post is just sharing some of the images I have taken throughout the day, and some of my observations while using the Gear 360.
This is a pretty good looking device. With the included mini tripod, it looks almost like a mini jellyfish.
(Gear 360 uses a standard tripod mount)
I have a few complaints in regards to the design though. Being an orb, this is not a device you can just put in your pocket. Also because of its design, you NEED to have a tripod/monopod in order to capture 360 content. Another small complain would be the included pouch doesn't really do much to protect the device during transportation.
The great thing about the Gear 360 is that it is plug and play. Put in a microSD card, and insert the battery and you're good to go. The 1,350mAh isn't exactly huge, but seems decent enough in my time with it. The fact that it is removable means that one can get extra batteries to swap on the go without the need to worry about charging time.
It supports Google Street View connection too which is a huge bonus for people who are into taking photospheres to add into Local Guides on Google Maps. The mode can be accessed by long pressing the Menu button.
When you press the Menu button, you cycle through these options.
Inside settings. The UI is simple and snappy enough, but it does mean that to change the timer from 0s to 2s, it requires 11 button presses (Yes, I counted).
This is my weapon of choice though instead of the included mini tripod. Yes, that's a selfie stick. Being able to extend the Gear 360 helps to create better looking 360 content.
The 0.5" PMOLED display is still nicely visible outdoors which is nice.
For times when I just want to capture wide-angled still images, I hold it like a Pokeball.
It's really really wide-angled.
Image quality is decent too most of the time. Colours are details are well represented too. I wished it had some sort of Auto-HDR mode though.
Comparing it to a shot I took on my iPhone SE at the same spot.
Decent quality too when it comes to video. Note the gradual changing of exposure with the change of environment. Something to take note off as well is that you need to inject metadata into the video before you upload it to YouTube, and the instructions are just here.
The 360 images turned out pretty nice too. I am not sure how to embed them, so just go the the album here to see all the still images I have taken.
At night there are a LOT of artifacts with the image processing which results in a less than ideal output in my opinion, issues with stitching are also exacerbated.
The Gear 360 is something that I probably wouldn't use too much in darker conditions.
Which brings us to the not so fun part about the Gear 360. All the while I have just been using the Gear 360 as a standalone device, and for the most part, it's a pretty painless experience. However in order to get a live view of what I am shooting, it needs to be connected to the Gear 360 Manager app. The downside is, it only works with a handful of Samsung smartphones (S6, S6 Edge, S6 Edge+, Note5, S7, S7 Edge). Or you could give this ported/modded app a try for other Android devices found on XDA. I definitely do not recommend this though as it's not official.
The Gear 360 manager is not just used for a viewfinder though. It is also the app that will transfer as well as stitch together the input from both lenses into a single monoscopic output. Which means that it is actually pretty important.
The un-stitched content would look pretty much like this, and if you upload them to YouTube, Google Photos, FaceBook, they wouldn't be able to "transform" them into viewable 360 content. Basically, without the Gear 360 Manager, you wouldn't be able to just grab the files off your microSD and upload them to wherever you want it to go.
This really restricts the official support for the Gear 360. The other alternative for stitching the content together would be Samsung's own Gear 360 ActionDirector software, BUT that's only for Windows PC. I only have Macs at home.
After some reading and Googling, and trying around for a while, I found a third party solution that works for stitching the footage together. The solution comes from Alex Pearce, and it requires Kolor's Autopano Video software, and a specific template that he created to help stitch the footage together.
There are just a few caveats though...
This is stitched together using the Gear 360 app.
This is stitched together using the trial version of Autopano. The stitching is noticeably worse than what the Gear 360 app could do.
See that "Total time" section at the bottom? It took my relatively ancient iMac close to 30 mins to render a 30 secs video. The same video took close to 2 mins or so on the Gear 360 app on an S7 Edge. Not fun, and I certainly won't recommend anyone to go this route. Not to mention that the software costs 299 Euro for the normal version and 599 Euro for the Pro version. At that price, it's probably easier to just get a used S6.
-----
Would I buy one?
Probably not.
The Gear 360 makes it super easy to create 360 content on the go, and it is definitely fun to view 360 content no matter on my phone, computer, or a VR headset. However it's not something I see myself using or needing unless it's for a special occasion (travelling, parties, wedding, etc).